If you don’t know the resistor colour code then it may at first seem to be a black art, but it is actually very easy to learn and once you can use it correctly you will have a real skill for life.
The method that we use at Learn Electrics is a much easier method to remember and use than most methods that are taught, and if it is easier to use then you are going to understand better and be more accurate with your interpretation of the colours, which is what we want – easy to use, easy to remember and accurate.
We are sometimes asked how we can determine the value of resistance by just looking at 3 or 4 little coloured bands and some even ask if it is worth learning. Well, in our opinion it is a very definite YES; it is definitely a useful career skill.
WHAT IS THE COLOUR CODE?
The colour code that we will show you here is not just used for resistors, there are other electrical components that use a version of this same code and many electrical wiring systems for industrial and control equipment will identify conductors and cables by using marker bands following the same colour code, especially in numerical control and robotic systems.
It is recognised across the world and if you know the colours and can interpret the numbers then it will help you a lot in your work.
But what is the resistor colour code? Let’s begin by looking at some resistors and the way that they are colour coded and we can see here the 3 basic formats that we are going to come across most of the time.
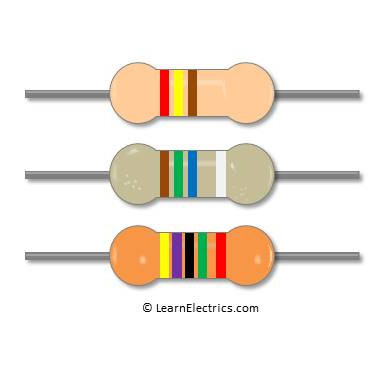
At the TOP of this drawing is a 3 band resistor. These three bands will give us the resistance value in ohms.
In the MIDDLE we have a 4 band resistor. The same three bands as the 3 band resistor are still there but there is now an extra, 4th Band. This 4th band does not affect the resistance value but tells us the tolerance or percentage variation in resistance. This is because very few resistors will be exactly the value indicated and depending on how precise the manufacturing process is this will determine how close the actual value is to the indicated value. But of course, there is a downside as the more precise values will cost more per item.
The 5 band resistor is shown at the bottom of the drawing. Most electronic circuits can cope with quite a wide range of values but for some electronic applications we may need to be more specific and demand more accurate values and so that is why we have the 5 band resistor. These are used where fine tolerances are needed, perhaps in control or monitoring circuits where extreme precision may be required.
Once we understand the importance of the each of the bands positions and the colours, the rest is easy.

Here we see the colours matched against the numbers 0 to 9 and this colour and number code does not change. It works for resistors, it works for cable markers and it works for other components.
Learn this by heart, it really is the key to everything.
There are two more colours available for some of the bands. These are gold and silver and they are used where extremely small resistance values, tenths or hundredths of an ohm, are required but you may not come across these very often.
3 BAND RESISTORS
We can begin by looking at a 3 band resistor. When you understand a three band resistor and can decode the colours into a resistance value then it is an easy step up to interpreting 4 band and 5 band resistors.
We can show our 3 band colour code as three columns –
Band 1, Band 2 and Band 3
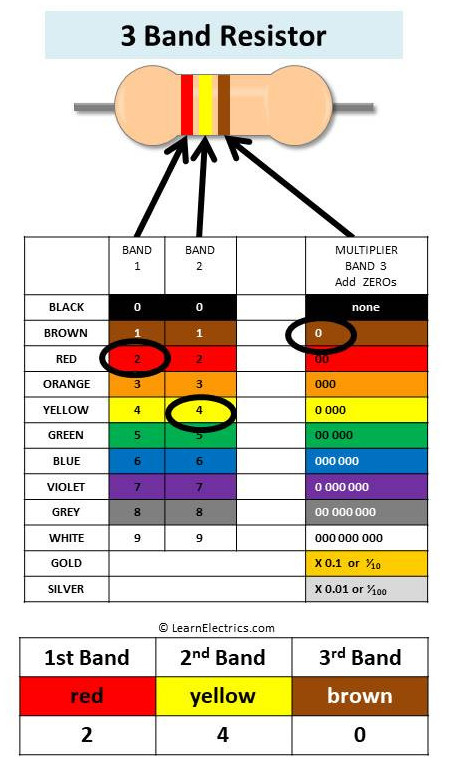
Look at this example, it is so very important that you learn to read the resistor correctly as there are two ways of reading the numbers, the correct way and the so very wrong way with numbers that make no sense at all. With practice this becomes very easy, automatic.
The 3 bands are in a group and this group will very obviously be more to one side than the other. This means that one band is closer to the outside, this is Band 1, then Band 2 and finally we have Band 3.
Let us read the resistance value then. Band 1 is RED, the chart shows red has a value of 2. Write it down.
Next, Band 2 is YELLOW and the value is shown as 4. Write this down. We now have 2 & 4.
Now we must add some zeroes. Band 3 is BROWN and the chart shows this has a value of 1 so we add one zero to the end of the numbers that we already have i.e. 2 4 0 or 240.
RED YELLOW BROWN indicates that our resistor is 240 ohms
There is no Band 4 so no tolerance is specified. We therefore assume the value could be plus or minus 20% which means our 240 ohm resistor could have an actual value anywhere between 192Ω and 288Ω and for most applications this will be perfectly acceptable.

Another example of a 3 band resistor is shown here. The first band is YELLOW with a value of 4. The second band is VIOLET with a value of 7. Band 3 is ORANGE and the chart tells us to add three zeroes onto the end.
So we have 4 7 and three zeroes – 4 7 000 or forty seven thousand ohms, sometimes written 47kΩ or 47 kilohms with the k representing a thousand.
GOLD AND SILVER BANDS
If band 3 is coloured gold then we do not add zeroes, as above, but instead divide the first two numbers by 10.
The 4 and 7 in the last example would become 4.7 Ω
If it is silver coloured then we divide the first two numbers by 100
and our 4 and 7 would become 0.47Ω, a very small value.
4 BAND RESISTORS
Let us move on to 4 band resistors. Learn to read them correctly. There is a block of three bands and a single band, sometimes slightly on its own, this single band is the tolerance value and is used after the value is worked out.

So, the three bands first and following exactly the same process as the previous slides.
Band 1 BROWN which is 1.
Band 2 is GREEN or 5
and Band 3 is BLUE which tells us to add 6 zeroes onto the end.
This gives 1 5 and 6 zeroes 1 5 000,000 or 15 Million ohms
This can also be called 15 Meg ohms, Meg meaning a million and can be written 15MΩ.
The tolerance band in this case is Red and column 4 shows plus or minus 2% from the marked value.
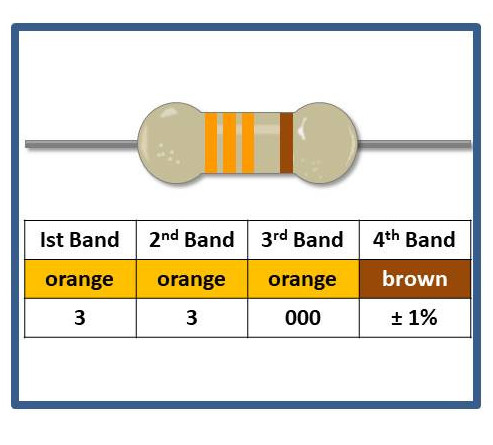
Now we see another 4 band resistor. Just to shake things up a bit bands 1, 2 and 3 are all orange.
Band 4 is brown.
We have orange, orange, orange, which is 3 3 3
This gives us 33 with three zeros or 33 thousand ohms, often written and pronounced as 33 kilohms.
Band 4 is brown and this is plus or minus 1%
This means that the actual value will be somewhere between 32,670 ohms and 33,330 ohms and would typically be used where more precision was required.
5 BAND RESISTORS
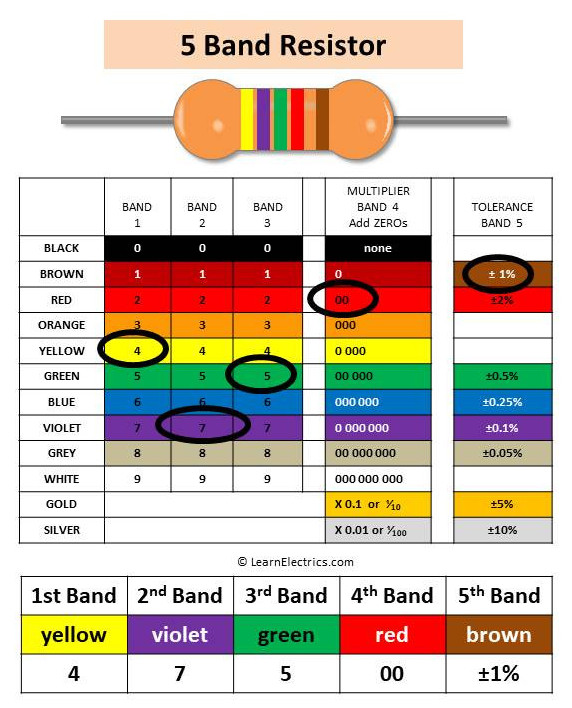
Now we move onto the five band resistors where much more accuracy of value is required
A block of 4 bands will now indicate the resistance value and a separate fifth band for the tolerance.
Because there are now 5 bands we find that they are often quite close together so care needs to be taken when deciding which are the value bands and which is the tolerance band. With practice this will become easier.
Look at the resistor shown on this chart.
Sometimes it helps to apply a little logic to the different coloured bands. The band on the left is yellow, and if we now look at the tolerance column on the chart. Yellow is not included as a tolerance colour so the yellow must be Band 1. But brown is in the tolerance column so that must be band 5.
Looking at the 4 value bands we have
yellow , violet, green and red
giving 4 7 5 and two zeroes, 4 7 5 00 or 47,500 ohms
band 5 is the tolerance at plus or minus 1%
ALL THE SAME VALUE
On this slide we have all three types of resistor shown and they all have the same value of resistance. Let’s look at the colour codes used.
 The 3 band resistor is yellow violet red which tells us 4 7 and two zeroes 4 7 00 or 4,700 ohms
There is no band 4 so we assume a tolerance of plus or minus 20%
The 4 band resistor is exactly the same as the three band plus a band 4
We have yellow, violet and red for 4,700 ohms and a brown tolerance band for ±1%
The 5 band is slightly different, it starts with yellow and violet but band three is not the same as the other resistors, it is black for a zero and now band 4 which is brown will tell us how many zeroes to add on and we now have 4 7 0 and one zero 4 7 0 0 giving 4,700Ω
Band 5, the tolerance band is brown and tells us this is ±1%
PRACTICE IS THE KEY TO LEARNING
Hopefully we have shown that the resistor colour code is actually very easy to learn. By following a few basic rules for each band type the value of resistance can be easily interpreted.
Repetition and practice is essential. Learn it by heart and you will have a very powerful gift in your mental toolbox. Practice on any resistors that you might see, or make up a resistance value and work backwards and decide what colour that resistance would be. With repetition comes long term memory. Me, personally, I have been using the resistor colour code for over forty years and I can go months without needing to use it, but when I do, I can instantly recall the colours; it’s just repetition and it can happen for you too with practice.
MEMORY JOGGER
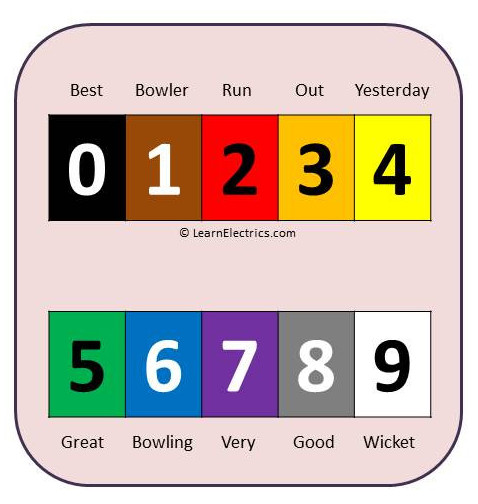
Many people will “invent” a memory jogger, a mnemonic, made up of the initial letters of each of the colours. Here is one that we teach, just because we like cricket. Feel free to make your own memory jogger, whatever will work for you.
Best Batsman Run Out Yesterday
Great Bowling Very Good Wicket
If we look at it against this chart of the colours, its usefulness can clearly be seen.
_____________________________________________________________________________
We also have a very active YouTube channel.
Type in LearnElectrics all one word, into the YouTube search bar and you will have access to all of our videos on many electrical topics.
There is a companion video to this article on YouTube which is called Resistor Colour Code
and can be easily found by using the following link …
https://www.youtube.com/watch?v=MNzpLtyS-ik
Many thanks for viewing
David